Showing posts with label quilts. Show all posts

Sunday, June 14, 2009

Giving those Kindergarten Quilts away


On Friday, the kindergarteners had a little show about bugs and ants and things like that. The room mom thought this would be a great time to present the quilts, and I agreed. It was nice for everyone who contributed (which between the money and the time with the kids to make the squares, in addition to the extra time that many of the moms spent helping to assemble it) was just about everyone. I told the room mom that I could present the quilts, no problem. She was going to hand off one of the quilts and I was going to hand off the other.


So I got up there to present them and the assistant teacher was looking at me and (seemingly at least) starting to tear up. Then I started to tear up (and totally forgot what I was going to say and blew the presentation!!). Then they opened the quilts and they both started crying and of course, half the moms in the room joined in.

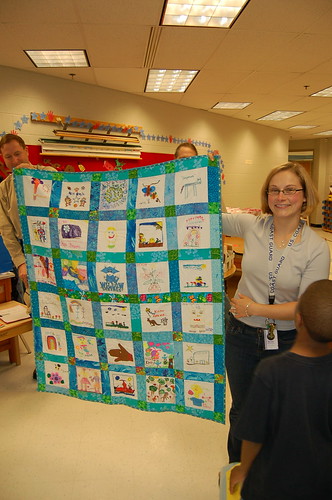
But it was a totally rocking end of school gift if I do say so myself. Check it out. This is the head teacher holding her quilt.


Here's the assistant teacher with her quilt:


All done with that- now on to the next project! And here's one last photo of my little pumpkin with her much-adored kindergarten teacher- aren't they cute?


Saturday, June 6, 2009

Putting it together

I only bring this up because when I put these two quilts together, I used three techniques I'd never used before. The first technique was using a basting spray to baste the quilt instead of 200+ safety pins. I wish I had taken pictures (story of my life), but here's how we did it.

1. Using duct tape, we taped the corners of the backing fabric to the floor. The backing fabric was wrong side up.
2. We liberally sprayed one side of the batting- cut so that it would roughly fit the backing fabric- and pressed it down to the backing fabric, starting in the center and working our way out to the edges. HINT: use latex disposable gloves so that your hands don't get covered in the extremely sticky and hard to remove basting spray.
3. We sprayed the face-up side of the batting, then took the quilt top and pressed it down on the batting, again starting in the center and working our way out to the edges.

Voila! Two quilts basted in about 10 minutes flat.

The second technique was tying the quilts instead of quilting them. I know this is a common technique for beginners, but I had never done this before. We wanted the kids to participate in the tying of the quilts, so I enlisted the help of a few moms and the aftercare teachers and we put all the the threads in and let the kids tie them during aftercare. The kids did pretty well, although some of them had to be shown how to make a square knot before they could help. I found out later that it's best to use curved needles for this, but we just used standard embroidery needles and four strands of floss. We tried to leave 4-5 inches of floss to give the kids enough room to make their ties. After tying we trimmed the floss down to about an inch each.

The last technique was attaching the binding entirely by machine. I had attempted this once and gotten so frustrated that I never tried it again. Luckily I found a post on the Sew Mama Sew forum that gave me better details. It was actually a link to a binding by maching tutorial. This worked like a charm. I love the look of a handstitched binding, but this was so easy I may never go back!

Friday, May 29, 2009

Assembling a Class Quilt: Part 2

Once you have all your squares from all your darling little artists, put them through a spin in the dryer to preserve their color. I recommend using a lingerie bag to keep your dryer from getting colorized. I didn't put the squares using fabric paints through the dryer, I figured there was too great a chance of them getting paint all over the other squares.

Next you need to cut your sashing fabrics. As you can see from the picture, we used squares and rectangles in the school's colors. I used an assortment of blues and greens- this was a bit of a stash buster project for me.
All seam allowances are quarter inch. We had 30 squares, so we needed 36 blue rectangles for the vertical sashing and 35 rectangles for the horizontal sashing.


Since the squares were 6.5 inches, the rectangles are 6.5 x 2.5 inches and the squares are 2.5 x 2.5. We sewed one blue rectangle to the left edge of each picture, and put an extra blue rectangle on the right edge of each square that landed on the end of a row. We then stitched the rows together.

For the horizontal sashing, sew green squares and blue squares alternating until your horizontal sash is the same length as your row of blocks and vertical sashes. You'll need one more row of horizontal sashing than rows of blocks.

Press seams to one side. On the rows of blocks, press the seams away from the blocks. On the horizontal sashing, press the seams towards the centers of the squares.

Sew the rows together, alternating horizontal sashing rows and rows of blocks. Where the seams are pressed to one side, line them up as you assemble the rows. This should give you nice crisp corners. (You'll have better luck with this if you DON'T use five different machines to put it together- but in my case, I was so happy to have the help I wasn't too worried about the rows lining up perfectly).

Once all the rows are together, you're ready to layer your batting and backing together and either quilt or tie your project.

Next installment: Putting it all together!