Thursday, May 20, 2010

Making another Neighborhood Quilt

So my friend Denise decided it was high time that we had another neighborhood project, because at least once a year I have to pull all my hair out and drive those around me crazy. She wanted to make a quilt for our friend Connie, whose 50th birthday party is coming up. Connie is amazing. She's one of those people who you meet, and 5 minutes later you feel like you've known her all your life. She's got 5 gorgeous boys (6 if you count her husband) and a beautiful house and she kicks butt at her job and everyone loves her.

In January, Connie was diagnosed with a brain tumor.

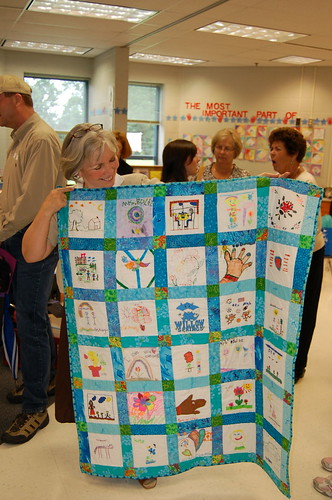
Some of the neighbors have been doing so much for the family- driving the boys places, making meals, taking Connie to doctor's appointments, threatening bodily harm to doctors who were less than empathetic, and just generally helping out. I on the other hand have done very little. When Denise mentioned a quilt for Connie that would be from all of us I immediately thought it was a great idea. Denise rallied the troops with an email asking for fabric, pictures, and contributions (for the additional materials), and we have realllly gotten some fabulous stuff so far.
Take a look! Is anyone surprised by the fabric Denise picked?


I know, I know, there is a big shiny splotch in the middle of the Gordons' picture. All I can say it, Marianna must have used some extra shiny photo paper because I took that darned pic about 10 times and this was the least offensive version I managed to get.
On Sunday we'll see how far we can get putting our top together. I have changed my mind about the pattern and I'm pretty excited. No previews though, you'll just have to wait and see!

Note, if you don't see your stuff here and you've dropped it off, it just means that I haven't had a chance to put it in a collage yet. Collage number three coming soon, I hope!

Look at all those gorgeous neighborhood families.  Aren't they beautiful?


Sunday, May 9, 2010

Emma and Kate Make Some Shirts

Emma decided she wanted to design her own shirt and in yet another fit of idiocy I agreed. Actually, this shirt wasn't too idiotic, the idiotic decision came later. So she and I drafted a pattern and made things up as we went along and came up with this:

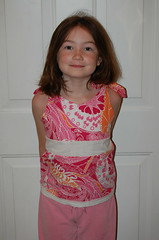
The shirt ties at the shoulder and it turned out pretty cute. Now for the idiotic decision- since Emma had a shirt, Kate wanted a shirt. Kate hasn't worn anything that wasn't knit fabric since 2005, so believing she was going to wear a crisp quilting fabric shirt was overly optimistic. The shirt turned out totally adorable, based on a pattern from the
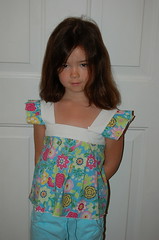
 Made by Rae post on Sew Mama Sew:

You can see from the expression on her face how thrilled she is with it. She wore it twice- once for the picture, and once to school because I talked her into it. After that, there was no convincing. It was not a tie-dyed t-shirt, and therefore not worthy of her time.
So. Know any 5 or 6 year old girls who would wear this? Cute shirt free to a good home.


100 Good Wishes Quilt


Hello again.

I got reminded the other day that I haven't posted here in oh, almost a year. So I thought maybe I should catch up a little. Shown above is Neighborhood Project #1... a quilt made for a friend in the neighborhood when she adopted a darling little boy from China. Lots of folks from the neighborhood contributed fabric squares that went into this Bow Tie Quilt. And then probably half of them helped to put it together- ironing, pinning, color-blocking, making the binding and backing- and most of all babysitting so I could finish up! Once it was done my neighbor Val even wrapped it up- so all in all it might have been my fastest quilt ever. (It was certainly the most stressful, but I don't need to go into all the details. Let's just say PROPOSAL at work and a shower date that was about a month earlier than expected, and leave it at that.)

Accompanying the quilt was a beautiful scrapbook that my friend Denise put together with all of the notes that everyone had written. In my opinion the book was nicer than the quilt- Denise did a ton of work on it and it was amazing.
Posted by Picasa

Sunday, June 14, 2009

Giving those Kindergarten Quilts away


On Friday, the kindergarteners had a little show about bugs and ants and things like that. The room mom thought this would be a great time to present the quilts, and I agreed. It was nice for everyone who contributed (which between the money and the time with the kids to make the squares, in addition to the extra time that many of the moms spent helping to assemble it) was just about everyone. I told the room mom that I could present the quilts, no problem. She was going to hand off one of the quilts and I was going to hand off the other.


So I got up there to present them and the assistant teacher was looking at me and (seemingly at least) starting to tear up. Then I started to tear up (and totally forgot what I was going to say and blew the presentation!!). Then they opened the quilts and they both started crying and of course, half the moms in the room joined in.

But it was a totally rocking end of school gift if I do say so myself. Check it out. This is the head teacher holding her quilt.


Here's the assistant teacher with her quilt:


All done with that- now on to the next project! And here's one last photo of my little pumpkin with her much-adored kindergarten teacher- aren't they cute?


Saturday, June 6, 2009

Putting it together

I only bring this up because when I put these two quilts together, I used three techniques I'd never used before. The first technique was using a basting spray to baste the quilt instead of 200+ safety pins. I wish I had taken pictures (story of my life), but here's how we did it.

1. Using duct tape, we taped the corners of the backing fabric to the floor. The backing fabric was wrong side up.
2. We liberally sprayed one side of the batting- cut so that it would roughly fit the backing fabric- and pressed it down to the backing fabric, starting in the center and working our way out to the edges. HINT: use latex disposable gloves so that your hands don't get covered in the extremely sticky and hard to remove basting spray.
3. We sprayed the face-up side of the batting, then took the quilt top and pressed it down on the batting, again starting in the center and working our way out to the edges.

Voila! Two quilts basted in about 10 minutes flat.

The second technique was tying the quilts instead of quilting them. I know this is a common technique for beginners, but I had never done this before. We wanted the kids to participate in the tying of the quilts, so I enlisted the help of a few moms and the aftercare teachers and we put all the the threads in and let the kids tie them during aftercare. The kids did pretty well, although some of them had to be shown how to make a square knot before they could help. I found out later that it's best to use curved needles for this, but we just used standard embroidery needles and four strands of floss. We tried to leave 4-5 inches of floss to give the kids enough room to make their ties. After tying we trimmed the floss down to about an inch each.

The last technique was attaching the binding entirely by machine. I had attempted this once and gotten so frustrated that I never tried it again. Luckily I found a post on the Sew Mama Sew forum that gave me better details. It was actually a link to a binding by maching tutorial. This worked like a charm. I love the look of a handstitched binding, but this was so easy I may never go back!

Friday, May 29, 2009

Assembling a Class Quilt: Part 2

Once you have all your squares from all your darling little artists, put them through a spin in the dryer to preserve their color. I recommend using a lingerie bag to keep your dryer from getting colorized. I didn't put the squares using fabric paints through the dryer, I figured there was too great a chance of them getting paint all over the other squares.

Next you need to cut your sashing fabrics. As you can see from the picture, we used squares and rectangles in the school's colors. I used an assortment of blues and greens- this was a bit of a stash buster project for me.
All seam allowances are quarter inch. We had 30 squares, so we needed 36 blue rectangles for the vertical sashing and 35 rectangles for the horizontal sashing.


Since the squares were 6.5 inches, the rectangles are 6.5 x 2.5 inches and the squares are 2.5 x 2.5. We sewed one blue rectangle to the left edge of each picture, and put an extra blue rectangle on the right edge of each square that landed on the end of a row. We then stitched the rows together.

For the horizontal sashing, sew green squares and blue squares alternating until your horizontal sash is the same length as your row of blocks and vertical sashes. You'll need one more row of horizontal sashing than rows of blocks.

Press seams to one side. On the rows of blocks, press the seams away from the blocks. On the horizontal sashing, press the seams towards the centers of the squares.

Sew the rows together, alternating horizontal sashing rows and rows of blocks. Where the seams are pressed to one side, line them up as you assemble the rows. This should give you nice crisp corners. (You'll have better luck with this if you DON'T use five different machines to put it together- but in my case, I was so happy to have the help I wasn't too worried about the rows lining up perfectly).

Once all the rows are together, you're ready to layer your batting and backing together and either quilt or tie your project.

Next installment: Putting it all together!

Thursday, May 28, 2009

Instructions for Creating a Classroom Quilt

AKA, Classroom quilt project.

When I was looking for instructions on this- not so much on making the quilt, but on what to send out to parents- I came up completely empty handed. To aid some of the rest of you out there who are equally lazy about writing up your own instructions to the classroom parents, here you go:


As an end of the year gift for our teachers, we are planning to create a memory quilt for both Mrs. B1 and Mrs. B2. No sewing skills necessary! All you need to do is the following-

1. Receive 2 squares of muslin in your Thursday folder
2. Put your child's name on the "back" of each piece in pencil (both sides are the same, just pick one to be the back). A name on the front is also okay if this is part of the decoration!
3. DO NOT CUT THE FABRIC. Don't change its size in any way.
4. Have your child draw a picture of anything they want on the muslins. Fabric crayons, marker, or paint are best, but you can also use Sharpies. They could also embroider or applique something on if you want to get fancy. Please draw one picture for each teacher- hence the two pieces. If they are different, then mark with the teacher's name on the back as well.
5. Leave a 1" margin (as best you can) around the outside of the picture. Some of the fabric will disappear into the seam allowance.
6. Return the finished pictures to (quilter's kid) by (your deadline here); big Ziploc bags are best so that the picture doesn't get harmed in transit.

That's it! If you can sew and want to participate further, please let me know:
your email (at) email (dot) com

Also, when the tops are completed we will tie the quilts together. I'll send an update then to see who wants to participate. There's a nice example of a teacher gift quilt (from a preschool class) here.

Please let me know if you and your child do NOT want to participate; otherwise I'll be pestering you after (your deadline) if your quilt blocks have not appeared.

Thanks!
signed, resident crazy person

Additional notes:
  1. If you don't care if this is a surprise, then by all means coordinate with the teachers to see if they would like to just do it as a classroom activity. We're trying to surprise our teachers.
  2. I asked for a small contribution ($3 - $5 per kid) to cover my costs. This did not cover the costs for the two quilts, but it was nice to have a little recompense. Between the batting, the muslin, the sashing fabrics, and especially the backing and binding fabrics, I probably spent over $100. Yikes.